| | Cook Shack RS Heater |  |
|
|
| Author | Message |
|---|
CVI04
Posts : 49
Join date : 2015-04-06
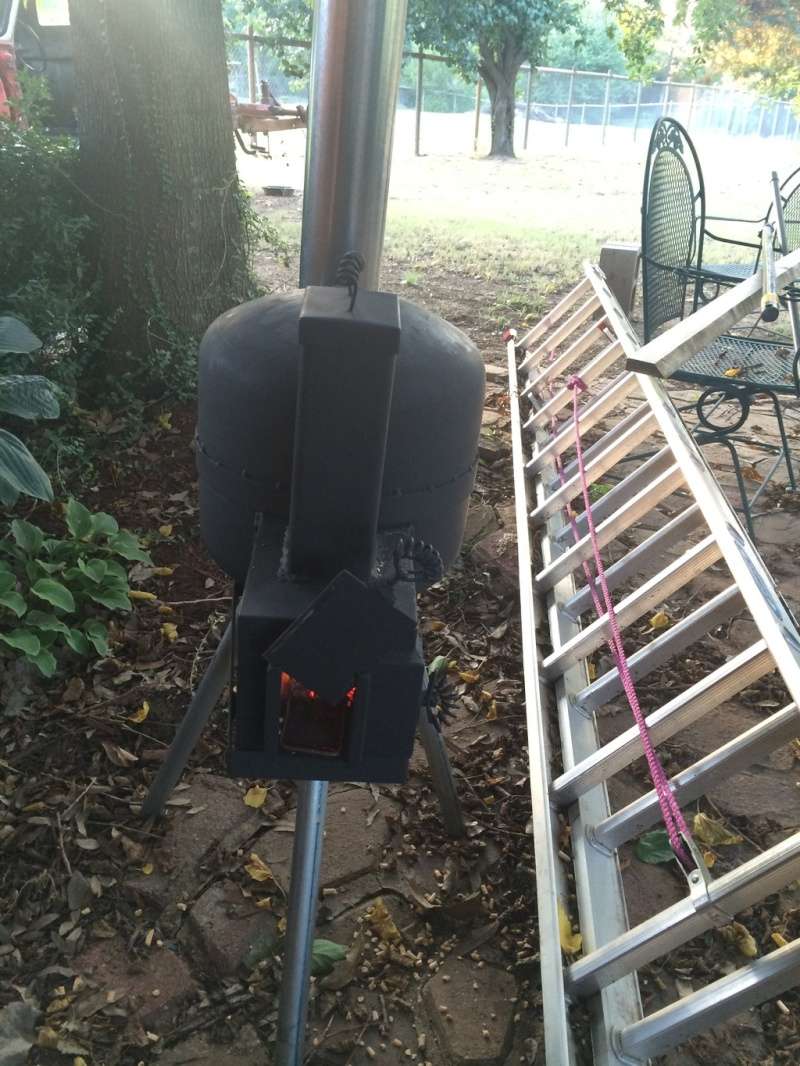
| | Subject: Cook Shack RS Heater Sun Apr 19, 2015 3:37 am | |
| | |
|
| | |
gadily
Moderator

Posts : 1477
Join date : 2013-12-08
| | Subject: Re: Cook Shack RS Heater Sun Apr 19, 2015 9:09 pm | |
| nice rocket stove build there
ive made the pics smaller and also added your video linked as well i hope you dont mind
i note 580 on the system which isnt that bad chimney is fine but do try to light it with a higher chimney it gives different results when lighting your system as i found out myself
query did you weld the seal strap on the top part of the gas bottle if you did try not to do as that way may break the seal on the lower part as the heat expands the metal
what happens when your refilling the system with pellets do you have to be quick to refill up or can it be left open a bit longer as you fill it before reseal with the cap on top | |
|
| | |
CVI04
Posts : 49
Join date : 2015-04-06
| | Subject: Re: Cook Shack RS Heater Sun Apr 19, 2015 11:36 pm | |
| Thanks gadily for making the pics easier to see!
The chimney pipe in the pics was just one of four that I used in the cook shack. So total I had 12 foot of chimney pipe. I am in the process of changing to a larger chimney to see if that will help.
I did not weld the two halves of the tank back together. It has a fiberglass rope seal and slip fit.
If there are enough pellets left in the hopper there is no problem adding more. If it is getting low enough the fire is trying build up into the hopper.
I am trying to address all of these issues on a rebuild. I will add pictures and explanation later in the rebuild. | |
|
| | |
caotropheus
Subscribers

Posts : 333
Join date : 2013-10-07
| | Subject: Re: Cook Shack RS Heater Mon Apr 20, 2015 4:30 am | |
| CV,
Do you have pictures or video of the building process?
Thanks | |
|
| | |
CVI04
Posts : 49
Join date : 2015-04-06
| |
| | |
Hitchhiker
Posts : 246
Join date : 2013-12-26
Location : nomad
| | Subject: Re: Cook Shack RS Heater Thu Apr 23, 2015 7:00 am | |
| | |
|
| | |
CVI04
Posts : 49
Join date : 2015-04-06
| | Subject: Re: Cook Shack RS Heater Thu Apr 23, 2015 10:03 am | |
| Thanks, Hitchhiker,
It is a cute little stove. I am currently making modifications to hopefully enhance the performance. It is intended to be mobile. Our cook shack at our hunting camp is about 200 sqft or about 18.5 square meters. Our shack is a tent structure so space is a premium. We cook, eat, store our food, and just hang out in the shack when the weather is bad.
I am intending on adding a copper coil for heating water which will be used for cleaning dishes, cloths and general cleaning. Does anyone have some input? I've seen some videos here and there, so I think I know what I need to do, but am always open for suggestions. | |
|
| | |
gadily
Moderator
Posts : 1477
Join date : 2013-12-08
| | Subject: Re: Cook Shack RS Heater Thu Apr 23, 2015 10:20 am | |
| depending on what you want to use the heating element side of it for remembering what heat your going to rob from the system vs the exit of the exhaust 2 or 3 ways to create a hot water system the standared basic version is a coil inside of the cylinder as main burn area or you can use a primary secondary heating system primary is on the flue pipe and the coil is your main third approach is using the main burn area where you light your sticks then to your secondary at flue point and further heating via your main burn area remembering every pipe added ads weight to the system being used https://woodstoves.forumotion.co.uk/t505-transfere-of-heat-to-water | |
|
| | |
Hitchhiker
Posts : 246
Join date : 2013-12-26
Location : nomad
| | Subject: Re: Cook Shack RS Heater Fri Apr 24, 2015 3:18 am | |
| - CVI04 wrote:
-
I am intending on adding a copper coil for heating water which will be used for cleaning dishes, cloths and general cleaning. Does anyone have some input? I've seen some videos here and there, so I think I know what I need to do, but am always open for suggestions. I have seen something like this with mass but not without. It will be interesting to see what you come up with. Be careful. | |
|
| | |
CVI04
Posts : 49
Join date : 2015-04-06
| | Subject: Re: Cook Shack RS Heater Fri Apr 24, 2015 6:39 am | |
| Thanks, gadily and Hitchhiker
I will be careful. I am only looking at heating 5 to 6 gallons of water at a time. Not sure if it will self circulate or if I will need a pump? Thinking of using a plastic water cooler as the storage tank. Replace the water outlet with other plumbing to be the water feed for the coil and dispense the hot water. I will have to drill a hole in the lid to have the return of the heated water. I'm thinking I need a pressure relief of some kind. | |
|
| | |
gadily
Moderator
Posts : 1477
Join date : 2013-12-08
| | Subject: Re: Cook Shack RS Heater Fri Apr 24, 2015 7:38 am | |
| you wont need a pressure relief valve as long as you leave the top loose could you give sizes of your system the burn chamber size front to the base of unit the chimney flue and your internal dimmensions of your cooling off area you will also need to get proper average calculations of heat via a heat gun in these areas as well top side of unit burn chamber flue with each inclusion of piping you need to know the heat lost using the water system therefore you decide where best to use the next heat area for warming our water up the better system is a primary heat warming the incoming water and the secondary heat as top up of heat to the water a 3 stage is much better than a 2 stage heating of water https://woodstoves.forumotion.co.uk/t478-outdoor-wood-boiler | |
|
| | |
CVI04
Posts : 49
Join date : 2015-04-06
| | Subject: Re: Cook Shack RS Heater Fri Apr 24, 2015 11:24 am | |
| Specifications on my stove:
Burn chamber: 3"X4" 11 gauge rectangle tube
Riser Tube: 4"X18" aluminized automotive exhaust pipe
Secondary air: 3/4" square tube that runs up the side of the burn chamber at an angle.
Distance between burn basket and riser is approximately 4.5"
Heat chamber is 12" diameter by 22" tall
Chimney pipe: 5" to 6" nesting chimney pipe for portable stoves
I have approximately 11.5" of riser tube exposed above the insulated burn chamber and secondary air.
| |
|
| | |
CVI04
Posts : 49
Join date : 2015-04-06
| | Subject: Re: Cook Shack RS Heater Sun Dec 27, 2015 4:04 am | |
| | |
|
| | |
CVI04
Posts : 49
Join date : 2015-04-06
| | Subject: Re: Cook Shack RS Heater Sun Dec 27, 2015 11:06 am | |
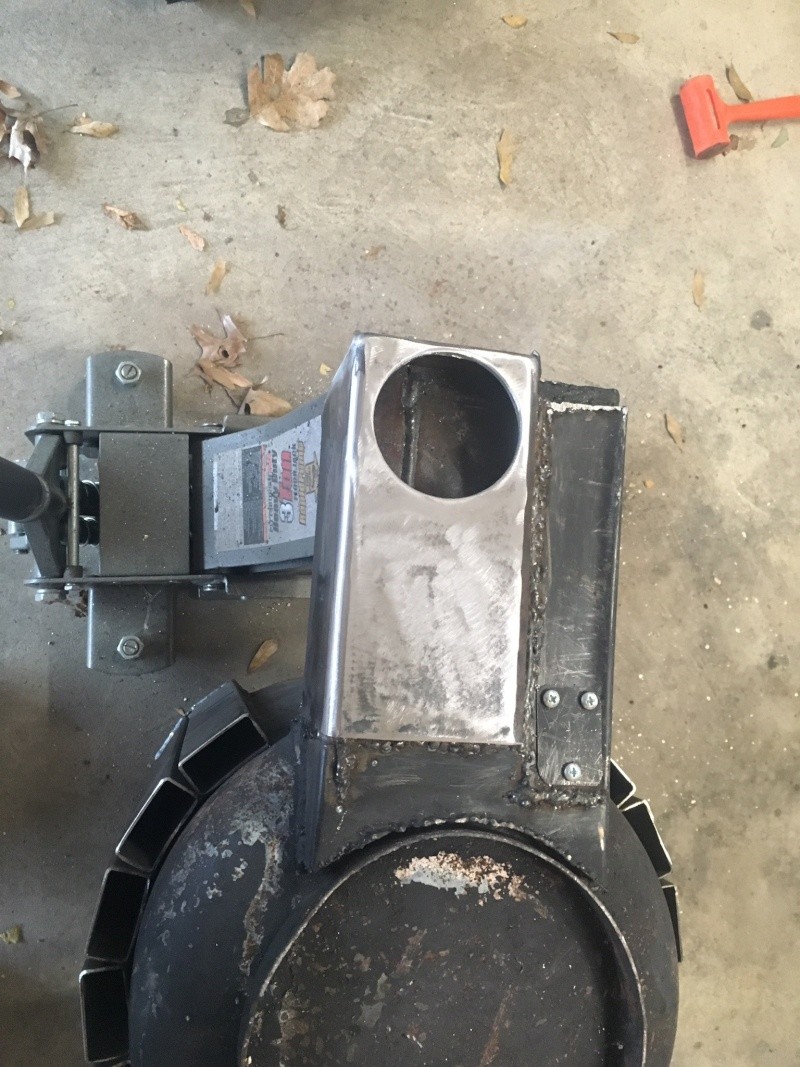
| Performance modification 2: Added a copper coil to heat water.  | |
|
| | |
gadily
Moderator
Posts : 1477
Join date : 2013-12-08
| | Subject: Re: Cook Shack RS Heater Sun Dec 27, 2015 11:58 pm | |
| looking great there glad of the wait with these pics
an interesting build i just hope that coil dosnt rob too much heat of the system as it heats up
im looking forward in seeing these results will be an interesting build when completed and also there testing that you are doing with it as well
have you considered warming your primary air to gain more heat at the moment or not ? | |
|
| | |
CVI04
Posts : 49
Join date : 2015-04-06
| | Subject: Re: Cook Shack RS Heater Mon Dec 28, 2015 7:27 am | |
| | |
|
| | |
CVI04
Posts : 49
Join date : 2015-04-06
| | Subject: Re: Cook Shack RS Heater Mon Dec 28, 2015 7:52 am | |
| gadily, the coil actually failed. I think it was to close to the riser tube which caused a scaling effect to happen and it clogged the system. I now have the copper tube going into the heat chamber and back out trying to keep away from the riser tube. I added a window to the door using the glass from an oven thermometer. It has given great visibility to the burn basket.   | |
|
| | |
T2H
Admin

Posts : 913
Join date : 2013-10-07
| | Subject: Re: Cook Shack RS Heater Mon Dec 28, 2015 11:39 am | |
| Very neat and creative stove.
I like its looks and as well really like your heat exchanger. | |
|
| | |
CVI04
Posts : 49
Join date : 2015-04-06
| | Subject: Re: Cook Shack RS Heater Mon Dec 28, 2015 12:21 pm | |
| Thanks T2H, I have had a great time working on it. The heat exchangers do work. I am debating creating a cowling to add forced air to the exchanger. | |
|
| | |
gadily
Moderator
Posts : 1477
Join date : 2013-12-08
| | Subject: Re: Cook Shack RS Heater Sun Feb 28, 2016 5:49 am | |
| been looking for this post for the last week
query here what size tube did you use for the added forced air to the heat exchanger
another question how is it running between the systems that you have used | |
|
| | |
CVI04
Posts : 49
Join date : 2015-04-06
| | Subject: Re: Cook Shack RS Heater Tue Mar 01, 2016 7:06 am | |
| Sorry it took me a while to get back to this, but work has been crazy. Good thing I guess!!
I used 1"X2" for the heat riser tubes, then created an upper cowling to direct the air into room. I still have not created the lower cowling the force the air through the tubes. Hope to get to that soon. | |
|
| | |
gadily
Moderator
Posts : 1477
Join date : 2013-12-08
| | Subject: Re: Cook Shack RS Heater Tue Mar 01, 2016 11:57 am | |
| thanks for that
i suspect that you used 3mm wall or is it 2mm wall on the 2x1 riser tubes | |
|
| | |
CVI04
Posts : 49
Join date : 2015-04-06
| | Subject: Re: Cook Shack RS Heater Tue Mar 01, 2016 2:10 pm | |
| 14 gage or 1.6mm on the 1"X2". | |
|
| | |
Sponsored content
| | Subject: Re: Cook Shack RS Heater | |
| |
|
| | |
| | Cook Shack RS Heater | |
|